first

July 30, 2014
At Home with Friends

4 comments

Double Chocolate Cookies

For my friend Krista, if it doesn’t include chocolate — it’s not dessert!

I was playing with chocolate cookie recipes for ice cream sandwiches. I loved these Double Chocolate Cookies. But when frozen with ice-cream, they seemed a bit too hard to bite into. My dentist would not approve!  They were so good, I decided to add them to the menu, knowing my chocolate loving friends would be thrilled.

Yes, they can be made ahead. They freeze beautifully if wrapped carefully and stored in an air tight container. Thaw at least 15 minutes before serving please.


DOUBLE CHOCOLATE SOFT COOKIES

EVENT: Summer Solstice

SERVES: Makes Approximately 2 Dozen Cookies


Ingredients

1 1/4 cups all purpose flour

6 tablespoons unsweetened cocoa powder

1/2 teaspoon baking soda

1/4 teaspoon salt

1/2 cup (1 stick) unsalted butter, melted and cooled

1/2 cup granulated white sugar

1/2 cup light brown sugar

1 large egg room temperature

1 teaspoon vanilla extract

1 cup chocolate chips (semisweet)


Directions

1. Preheat oven to 350 degrees. Line two baking sheets with parchment paper.

2. Combine flour, cocoa powder, baking soda and salt in a bowl, mix thoroughly and set aside.

3. Using a free standing mixer with paddle attachment, cream butter and both sugars. Beat until light and fluffy.

4. Add the egg and vanilla extract and beat until well incorporated. With mixer on low, gradually add the dry ingredients to the wet, stopping to scape down sides of bowl if needed. This is a fairy thick batter.

5. Remove bowl from stand. Using your hands or large spoon, mix in the chocolate chips, making sure that they are evenly distributed.

6. Using a cookie scoop or tablespoon, drop rounded scoops onto baking sheets.

7. Bake approximately 10 minutes only until the tops are dry. Remove from oven. Using spatula, transfer to cooling rack and cool thoroughly.

8. Once cooled, store in air-tight container for 3 days or freeze. To freeze, line air-tight container with waxed paper. Place cookies two at a time, bottoms together, and either wrap individually or store in container. Keeps one month.

July 28, 2014
At Home with Friends

5 comments

Halibut with Artichoke Puree

Growing up, we rarely ate fish. On the few occasions my mom made fish for dinner, the entire house took on a fishy smell. Not very appetizing. I don’t know what kind of fish she cooked because it was always served with a huge glop of heavy mayonnaisey tartar sauce. I figured that the tartar sauce was meant to kill the taste of the fish, and it worked.

If my parents were going out for the evening, we got those frozen battered fish sticks. When I was a kid, they were actually made from a whole piece of halibut that had been dipped in a heavy batter and quick frozen. I loved them. What kid doesn’t love food covered in heavy batter? I remember the coating but had no idea what the fish tasted like.

As I grew up, I started ordering fish in restaurants and actually tasted the fish for the first time. I tasted the difference between really fresh fish and frozen. I was still reluctant to prepare fish at home. I was afraid. Afraid the house would stink. Afraid I would overcook the fish.

But I overcame my fears, which opened up an entire new world. I learned that really fresh fish has a subtle flavor that needs to be enhanced by any sauce, not overwhelmed by it. I also learned that as much as I like to prepare things ahead of a party, this doesn’t necessarily work with fish. But it gives me yet an opportunity to have a friend help me out in the kitchen. The rest of the guests are more than happy to continue having another glass of wine and talking at the dinner table while we prepare the fish.

When halibut is fresh, it’s one of my favorite foods to cook and serve. The taste is subtle and the texture is buttery when cooked properly. We all know there is nothing worse than overcooked halibut. Too often, even in good restaurants, the fish is overcooked, dry and tasteless. Follow my method and your halibut will be amazing. It’s a very simple method and easy to master.

Halibut is a perfect fish to pair with almost any sauce. I serve it on a bed of artichoke puree. The puree is flavored with tarragon and leeks, which beautifully compliment the halibut. It is made ahead and gently warmed on the stove, while you cook the halibut. The puree is substantial enough that my vegetarian guests don’t leave hungry. (Of course, at my house it’s impossible to leave hungry.)

When you read the recipe, you might think it is a lot of butter and oil. You want the halibut to be gently bathed in the butter-oil mixture. Halibut contains very little oil, so this keeps the fish incredibly moist and most of the butter / oil stay in the pan after the fish is cooked. Another trick to preparing fish for several people is to buy pieces that are all the same size. I buy 6-oz. portions and ask my fish monger to make sure that they are all the same size and thickness. This ensures that they will all cook evenly. Now, if you’re still afraid of halibut, buy one piece, use the cooking method I suggest, decrease the butter / oil to 1 tablespoon of each — and try it. Think of it as a dress rehearsal before the big event. You’ll see how easy it is to prepare perfect halibut.

Overcome your fear of fish and try this recipe!


HALIBUT WITH ARTICHOKE PUREE

EVENT: Summer Solstice

SERVES: 10 – 12 people

Ingredients

For the halibut:

10-12 six oz. halibut fillets, room temperature

Salt and pepper

3-4 tablespoons unsalted butter

2-3 tablespoons olive oil

Directions

1. Rinse fillets under cold water and pat dry.

2. Season each fillet generously with salt and pepper.

3. In a large saute pan or 2 medium pans, heat olive oil and butter over low heat.

4. When oil is hot and butter is melted and just starting to bubble, place all the fillets in the pan or pans.

5. The fish won’t take long to cook. The cooking time varies depending on the thickness of your fillets. The rule of thumb is to measure the thickest part of fish and allow 10 minutes for every inch. One-inch thick fillet would take 5 minutes per side.

6. Keep an eye on the fish. Don’t walk away to get another glass of wine, have someone bring it to you.

7. After 5 minutes, turn the fillets over. It probably needs another 4-5 minutes.

8. The fish should be opaque in the center. Remember it will continue to cook after you take it off the stove.


ARTICHOKE PUREE

The artichoke puree isn’t complicated. Just remember to cook the leeks and the shallots very slowly over low heat. This enhances the flavor. Also, be sure and buy artichoke hearts packed in water. The ones packed in oil usually have lots of seasonings. You want the subtle suggestion of fresh tarragon in the recipe to compliment the artichokes and fish.

A TIP: If you have leftover puree, you can add more stock to thin it and freeze it in ice cube trays. You have homemade artichoke soup waiting for that night when there is nothing in the house and soup is just perfect.


Ingredients

For the artichoke puree:

3 cups chopped leaks (whites only)

1/3 cup shopped shallots

1/2 cup chopped scallions (green part only)

2 tablespoons olive oil or neutral oil such as grape seed

1/8 cup chopped fresh tarragon

2 1/2 cups packed chopped fresh spinach *

3 cups chicken or vegetable stock

3 jars (19 oz.) whole artichoke hearts, in water, drained and chopped *

Salt and pepper to taste

1 teaspoon balsamic vinegar *

1/2 cup heavy cream (optional)


Directions

1. In a large saute or large sauce pan, over low heat, slowly cook leeks in oil.

2. Add chopped shallots and scallions and cook over low heat until they are very soft.

3. Add 3 cups stock and bring to gentle boil.

4. Add artichoke hearts, heat through.

5. Add chopped tarragon. Cook 2 minutes.

6. Add chopped spinach and mix thoroughly. Cook for 1 minute.

7. Turn off heat. Allow to cool.

8. Puree in batches in Vitamix or food processor.

9. Taste for salt and pepper.

10. Add 1 teaspoon balsamic vinegar.

11. Add optional heavy cream. **

* A NOTE: I purchase quite a few items for this recipe at Costco: whole artichokes packed in water, fresh spinach and balsamic vinegar.

** ANOTHER NOTE: This can be made a few days ahead. If you’re making it ahead, don’t add heavy cream. Bring puree to room temperature before reheating over low heat. Add heavy cream just before serving.

ANOTHER TIP: This recipe can easily become artichoke soup with the addition of more stock, to desired consistency.


To serve:

1. Put artichoke puree on the dinner plate. Place fish on top with a piece of artichoke. If you’re feeling decadent, put a spoonful of the butter-olive-oil liquid on top of the fish.


 

July 25, 2014
At Home with Friends

6 comments

Roasted Baby Vegetables

My friend Dano, who volunteers to play bartender, is now a vegetarian. Over the years, during his pre-vegetarian days, we shared many meals. Dano and I worked our way through racks of lamb, short ribs and homemade tequila-cured gravlax. He hated vegetables and little by little I snuck a few on his plate. Surprise! He liked them.

I followed a simple rule which I gladly pass on to you: When it comes to vegetables, don’t overcook, don’t under-season. If you don’t overcook, they retain their gorgeous colors, textures and flavors. If you don’t under-season, the herbs and spices enhance the natural flavors of the vegetables. I use fresh or dried herbs and always kosher salt.

Buy small quantities of the herbs and spices you use most. The basics include basil, oregano, thyme and tarragon. If you buy small bottles, these will be used up in a year.

If you want your family and friends to eat vegetables, make them look vibrant and taste great. They will disappear!

Note: If using dried herbs, please smell and taste them before adding to vegetables. If they have been on the shelf or in the drawer since longer than you can remember, they probably have no taste and need to be replaced.


ROASTED BABY VEGETABLES

EVENT: Summer Solstice

SERVES: 10 – 12 people

Ingredients

2 bags (32 oz each) mixed fresh baby vegetables (I get these from Costco)

3 tablespoons dried basil

1 1/2 tablespoon dried oregano

2 tablespoons olive oil

2 teaspoons kosher salt


Directions

1. Preheat oven to 425 degrees.

2. Wash vegetables.

3. Place in a large bowl. Toss with olive oil to lightly coat vegetables.

4. Toss with dried basil and dried oregano.

5. Place on 2 large baking sheets.

6. Sprinkle kosher salt on top, distribute evenly.

7. Roast 20-25 minutes until vegetables are cooked and start to brown very slightly.

A NOTE: These can be made early in the day and warmed before serving.

July 23, 2014
At Home with Friends

4 comments

Parmesan Cheese Twists

If you’ve never worked with puff pastry, try these immediately! Don’t be afraid, it’s super easy. No matter how many you make, they will all be gone. This recipe makes use of readymade puff pastry. You will find it in the frozen food department of any supermarket. The most readily available brand which I use is Pepperidge Farm.

This recipe uses parmesan cheese, poppy seeds and red chili flakes. But you can substitute seasonings. Try dried oregano or fresh parsley or asiago cheese. You are only limited by your imagination.

I make them ahead and freeze them and bake them straight from freezer just before guests arrive. The house smells amazing and the guests start salivating and immediately ask, “What smells so good?”.


POPPY SEED PARMESAN CHEESE TWISTS

EVENT: Summer Solstice

SERVES: Yields approximately 20 pieces per puff pastry sheet


Ingredients

1 sheet frozen Pepperidge Farm puff pastry, thawed

1 egg

1 tablespoon water

1 cup grated Parmesan cheese *

1 1/2 teaspoon poppy seeds

1/2 teaspoon red pepper flakes

Equipment

Parchment paper

Baking sheets


Directions

1. Preheat oven to 400 degrees.

2. Mix egg and water. Set aside.

3. Thaw pastry sheets at room temperature for 30 minutes.

4. Unfold pastry on lightly floured surface. Roll into 14X10” rectangle.

5. Brush entire pastry sheet with egg wash.

6. Sprinkle 1/2 of rectangle closest to you with cheese, poppy seeds and chili flakes.

7. Fold top half of dough over bottom which has the cheese, poppy seeds and chili flakes. Gently pat with hand or roll with rolling pin to seal.

8. Using a pizza cutter, cut into 1/2” strips.

9. Twist strips, by holding each end and twisting.

10. Place on parchment lined baking sheets. Brush with egg mixture.

11. Bake at 400 degrees, 10-15 minutes until golden and crisp. Serve warm or at room temperature.

DO AHEAD TIP:  Place baking sheets with unbaked twists in freezer and freeze twists. When frozen solid, remove individual twists from sheet and store in plastic ziplock bags. To serve, remove as many as you like from bag, place on parchment lined baking pan and bake frozen at 425 degrees, 10-15 minutes.

* A NOTE: I purchase the grated Parmesan cheese at Costco and store it in my fridge.

July 21, 2014
At Home with Friends

3 comments

Prosciutto & Mango

During a vacation in Italy, a friend I was traveling with ordered prosciutto and melon as an appetizer. I thought of all the delicious choices on the menu, it was the most boring. And then I tasted it. Wow! The contrast between the tissue paper thin, perfectly cured, salty prosciutto and the juicy, ripe, sweet melon was incredible.

Back home, I ordered it only to be disappointed. The prosciutto was imported from Italy and paper thin but the melon was tasteless. Finding ripe melon at just the peak of perfection can be a challenge and depends on the time of year.

When melon wasn’t available, I decided to try mango instead. Double wow! I liked it better than the original. I then drizzled really good aged balsamic vinegar* over it and I have never searched for the perfect melon again.

A word about balsamic vinegar. This is the real deal that is as thick as chocolate sauce and pricy. If you don’t have this, omit it! It will still be great. Make sure your mangoes are ripe and that you are using tissue paper thin sliced Prosciutto di Parma. You can look for this at Italian delis, Whole Foods or where I buy mine: at Costco.

A NOTE: * Please read entry on Balsamic Vinegar so you know what to look for and what to buy.


PROSCIUTTO AND MANGO

EVENT: Summer Solstice

SERVES: Serves 10 – 12 People

Ingredients

12 oz (3/4 lb) slices Prosciutto di Parma, sliced very thin

4 mangos, peeled and cut into pieces approximately 1 ½” long

Balsamic vinegar

Directions

1. Cut each sliced prosciutto into thirds.

2. Wrap one piece around each piece of mango.

3. Drizzle balsamic vinegar over pieces.

July 21, 2014
At Home with Friends

2 comments

Balsamic Vinegar

WHAT’S THE STORY ON BALSAMIC VINEGAR?

Many years ago, I heard people bragging about how they spent hundreds of dollars on balsamic vinegar. I thought they were nuts.

But one day I happened to be in a cooking store when they were having a balsamic vinegar tasting. For the first time, I experienced what everyone was talking about and I bought my first bottle of expensive balsamic vinegar. The flavor was a rich complex balance of sweet and sour. The texture was smooth and the consistency like chocolate syrup.

So what do you buy? How can you tell the difference between the 4-dollar bottle and the 400-dollar bottle?


So, here is the story:

The most expensive balsamic vinegars are labeled ACETO BALSAMICO TRADIZIONALE DI MODENA or DI PEGGIO EMILIA. This label is protected by the European Union. It is produced only in Modena or Reggio Emilia and is aged a minimum of 12 years and up to 25 years. It is a thick syrup with a rich glossy complex flavor that balances sweet and sour. It is served drizzled on fruit or chunks of cheese to enhance the flavor.  The type most often used in this country is a commercial grade of CONDIMENTO BALSAMICO. This can be made in different ways. Condimento can be made by producers of TRADIZIONALE balsamic with less than 12 years aging, made by the same method as TRADIZIONALE but outside Modena or Reggio Emilia; or it can be made of wine vinegar with additives to artificially mimic the sweetness and thickness of the expensive stuff.


So what to buy?

I look for products that have the IGP label (check out the photos.) IGP is an acronym for INDICAZIONE GEOGRAFICA PROTETTA (Protected Geographical Indicator).  It identifies a product as originating from a specific region and ensures that the product is authentic and of the highest quality.  I have two different types of balsamic vinegar that I use all the time. They both have IGP labels. One is from Costco and I use it in salad dressings, sauces and soups.

The second is much more expensive and is actually the same brand I purchased many years ago. The store stopped selling it but I found it on Amazon. It is thicker and more like syrup. This is what I drizzle on the Prosciutto and Mango. It enhances everything you use it on. It’s expensive but you use it very sparingly. The bottle lasts me more than a year.  (I am posting a photo of the actual bottle, so you can see the IGP label and the brand I use. Let me know if you find another brand that you think is great and I will buy it.)

Don’t waste a drop!

Ciao!


July 18, 2014
At Home with Friends

11 comments

Kosher Salt

I use kosher salt in many recipes.

Kosher salt is a variety of edible salt with a much larger grain size than ordinary table salt. Kosher salt is easier to pick up in your fingers and evenly distribute over food. I use it in everything except baking. I use regular table salt in baking because it dissolves quicker and is usually mixed in throughly with other ingredients, so even distribution is not an issue.

A cup of regular table salt has approximately twice the salting power of a cup of kosher salt.

If the recipe calls for kosher salt and you only have regular salt, cut the measurement in half.

July 18, 2014
At Home with Friends

5 comments

Smashed Potatoes

I’ve been making these for many years. My friends can attest to this. I wanted the equivalent of homemade potato chips without all the frying. Recently the New York Times posted a recipe for smashed potatoes that is similar but different. I think mine are better.

This is a great recipe to add to your personal collection. It’s simple, tastes great and enhances the rest of the meal. Also, I use these as the base for appetizers, topping them with smoked salmon and cream fraiche.

If you want to splurge, top them with caviar and sour cream for an over-the-top sensation. Enjoy!


SMASHED POTATOES

EVENT: Summer Solstice

SERVES: 10 – 12 people


Ingredients

Approximately 3 lbs ruby gold small potatoes*

Olive oil

Kosher salt (see kosher salt under Ingredients) **

Equipment

2-3 baking sheets Parchment paper

Directions

1. Preheat oven to 425 degrees.

2. Steam whole potatoes until soft but not falling apart, approximately 10 minutes. Test one potato by putting it on on a plate, placing a small piece of parchment paper over it and pressing down with the palm of your hand. It should flatten easily.

3. Remove all potatoes from steamer and allow to cool.

4. Line baking sheets with parchment paper.

5. Place cooled, steamed potatoes on baking sheets.

6. Place a small piece of parchment paper over a potato and push to flatten it. Repeat with each of the potatoes.  NOTE:  You can do this the day before the party. Cover sheets with plastic wrap until ready to bake.

7. Lightly drizzle olive oil over potatoes. Sprinkle generously with kosher salt.

8. Bake at 425 degrees for approximately 15-20 minutes until the edges turn brown and the potatoes are crisp.

9. Time may vary depending on the starch content, moisture and size and thickness of potatoes.  Keep an eye on these so they don’t burn.

* A NOTE: I buy 1-inch potatoes. If you can’t find these, you can buy slightly larger red potatoes and cut them in half to make pieces 1-1 1/2 inches.


** ANOTHER NOTE: Kosher salt is sold at Costco, and I do purchase my supplies of it there.


July 16, 2014
At Home with Friends

6 comments

Cold Minted Pea Soup

When I was growing up, we only had soup when we were sick. Then, of course, it was chicken soup. Since then, I learned to love simple pureed vegetable based creamy soups. This is one of my all time favorites because it’s simple to make, very versatile and freezes beautifully. Another make-ahead dish.

For this menu, I’m serving it as an appetizer, chilled in espresso cups (available at my Amazon Affiliate Store). They only hold 2-3 ounces, so you’ll see a pitcher of extra soup. My friends feel free to wander into the kitchen in search of seconds. So, I include the pitcher to save them the trip.

It’s a very handy recipe. I have also served this warm, as a first course instead of salad. This makes a large batch intentionally. I pour any extra into ice cube trays, freeze them and when frozen, pop the soup cubes into a ziplock bag and store in the freezer. It’s easy to take out as many cubes as you need, warm it slowly on the stovetop and enjoy homemade soup.

Don’t add the heavy cream, creme fraiche or other garnish until serving. These really are optional. In fact they weren’t included for this party and still the soup was delicious.


COLD MINTED PEA SOUP

EVENT: Summer Solstice

SERVES: Yields Approximately 2 1/2 Quarts


Ingredients

4 cups chopped onions

4 tablespoons unsalted butter or olive oil

32 oz. chicken or vegetable stock *

1/2 cup fresh mint leaves, chopped

2 16-oz bags frozen sweet peas

1 6-oz bag fresh baby spinach, roughly chopped *

Juice 1/2 lemon

Salt and pepper to taste

1/4-1/2 cup heavy cream or creme fraiche (optional)

Mint or chives for garnish (optional)


Directions

  1. In a large stock pot, over medium heat, cook the onions in oil or butter stirring occasionally until soft and translucent, approximately 15-20 minutes.

  2. Add 32 oz. of stock and bring to gentle boil.

  3. Add frozen peas and mint. Cook just a few minutes, no longer! Peas cook very quickly.

  4. Add spinach and stir.

  5. Remove pot from heat and allow to cool thoroughly.

  6. Puree in batches either in blender, food processor or Vitamix machine. If using a Vitamix machine, the soup will be smoother. If using a blender or food processor, you should process it and then strain it through a fine metal strainer into bowl. Process the remaining solids adding a bit of liquid, if needed, a second time for a smoother soup.

  7. Add salt and pepper to taste. Add fresh lemon juice.

  8. Chill overnight or put in ice-cube trays and freeze as cubes. Thaw completely before

  9. OPTIONAL: Before serving, stir in 1/4-1/2 cup heavy cream or a dollop of cream fraiche.

  10. Keep cold until ready to serve. Fill each bowl or cup and garnish with a sprig of mint or fresh chives.


* A NOTES: I buy fresh spinach and the organic chicken stock at Costco.


July 14, 2014
At Home with Friends

7 comments

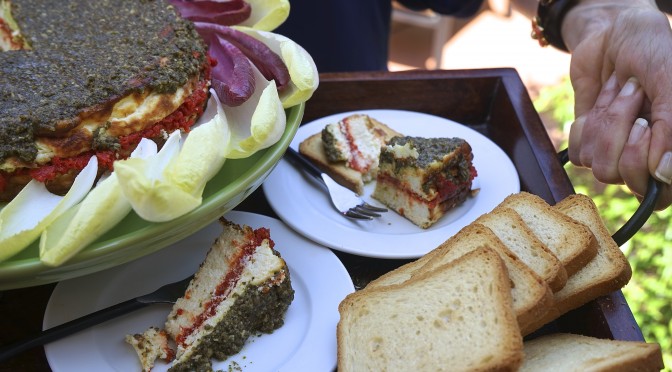
Savory Goat Cheese Cake

I love the idea of taking sweet dessert recipes and making them savory. Creating something unexpected. That’s where the idea of a Savory Goat Cheese Cake came from.

Once I made it, I thought why not go further and turn it into a layer cake, and this is the result. Your guests will rave, it’s easy and you can make the cake in advance and freeze it in the springform pan.

I use two different types of pestos. I love the vibrancy of the colors and combination of flavors. Serve it with crackers, slice baguette or Belgian endive spears.


SAVORY GOAT CHEESE CAKE

EVENT: Summer Solstice

SERVES: 10 – 12 people


Ingredients

For the cheesecake *:

11 oz cream cheese room temperature

6 oz (3/4 cup) whole milk ricotta cheese room temperature

8 oz goat cheese room temperature **

3 large eggs room temperature

1/2 cup sour cream


For the pesto (2 Flavors): (See Pesto Recipe)

7 oz (3/4 cup) each flavor

Good choices traditional pesto and sun dried tomato

1/2 – 3/4 cup sun dried tomato pesto


Equipment

7” springform pan


* A NOTE: Cake without pesto can be refrigerated up to 3 days or frozen. Defrost in refrigerator. Remove sides of pan and spread pesto close to serving time.


Directions

  1. Preheat oven to 350 degrees.

  2. Butter or line 7” springform pan. I use super parchment baking liner *. I cut a circle to fit bottom and wide strips to fit around the sides of the pan.

  3. Using a hand-held or free-standing mixer, mix cream cheese, ricotta and goat cheese until well blended.

  4. Add in eggs and mix until thoroughly incorporated.

  5. Add in sour cream and mix until thoroughly blended.

  6. Pour into springform pan.

  7. Bake 45-55 minutes until top is puffed.

  8. Remove from oven. Cool completely on rack. Leaving the cake in pan, when cool, place in refrigerator at least 24 hours.

  9. Remove sides of pan. Carefully, using a serrated knife, slice through middle of the cake horizontally, making two layers.

  10. Remove top layer. Spread one flavor of pesto on bottom layer.

  11. Put top layer over bottom. Spread second flavor of pesto on top of the cake.

  12. Keep refrigerated. Remove approximately 30 minutes before serving.

  13. Serve with crackers, sliced baguette and spears of Belgian endive.


* A NOTE: Super parchment baking liner is a “never stick” baking liner that comes in 13X17” sheets. Unlike regular parchment paper, these sheets are washed and reused. I cut a circle to fit the bottom of the springform pan and wide strips to go around the sides. I store the pieces together with the pan that they fit. It saves time, improves results and the clean up is easy. You can buy them at cooking supply stores or at my Amazon Affiliate Store.


SUN DRIED TOMATO PESTO

EVENT: Summer Solstice

YIELDS: Approximately 1 1/2 cups.


Ingredients

1 1/2 cups sun dried tomatoes *

2 cups warm water

2/3 cups Parmesan cheese **

1 clove garlic

1/8 teaspoon red pepper flakes

Salt to taste

1/2 cup olive oil


* A NOTE: Do not buy sun dried tomatoes packed in oil. They usually have a slightly chemical taste and if you read the label you will understand.


Directions

  1. Soak sun dried tomatoes in bowl with warm water approximately 10-15 minutes.

  2. Remove tomatoes from water and drain. Reserve water.

  3. In a food processor fitted with metal blade, process the garlic until smooth.

  4. Add dried tomatoes, Parmesan cheese, red pepper flakes. Process until smooth.

  5. Slowly add olive oil and process to a thick paste.

  6. Taste and add up to 1/4 teaspoon of reserved water if pesto is too thick. I like this pesto to be a little thicker than the walnut basil pesto. I use this for the filling in the cake.


WALNUT PESTO

EVENT: Summer Solstice

YIELDS: About 1 cup.


Ingredients

1 clove garlic

2 cups (packed) basil leaves

2/3 cup grated Parmesan cheese **

1 cup chopped walnuts **

1/4-1/2 cup olive oil


Directions

  1. In a food processor fitted with a metal blade, process the garlic until smooth.

  2. Add basil, Parmesan cheese and walnuts. Process until ground.

  3. Add olive oil and process to a thick paste.

A NOTE: This can be refrigerated in airtight container for up to 4 weeks.


** AN OVERALL NOTE: I purchase goat cheese, walnuts and grated Parmesan cheese at Costco.